May 5, 2012

Quick Mustard Lamb with Rosemary Potatoes

This is a handy recipe, from Donna Hay's "No Time To Cook", for those nights when dinner needs to be out on the table quick-smart in 30 minutes' time. Adding sugar to the mustard glaze promotes a wonderful caramelising effect that intensifies the flavours and produces a rich, glossy finish on the lamb. I omitted the frozen peas and in its place cooked a few peeled baby carrots with the chat potatoes.

Serves 2:
- 30g butter
- 600g chat potatoes, thickly slicked
- ½ cup (125ml) beef stock
- 1 tbs rosemary leaves
- ¾ cup (90g) frozen peas
- 350g lamb back-straps (or lamb chops or cutlets)
- 2 tbs wholegrain mustard
- 1 tbs brown sugar

Heat butter in a medium non-stick frying pan over a medium heat. Add the potatoes, stock and rosemary. Cover and cook for 10 minutes. Add the peas and cook for a further 3 minutes or until potatoes are tender. Remove from the pan and keep warm.

Wipe out the pan and place over a medium-high heat. Spread lamb with combined mustard and sugar.


Cook for 3 minutes each side (less if it is cutlets) or until cooked to your liking. Serve with the warm vegetables.


 Mustard Lamb Cutlets with Roast Potatoes

Mustard Lamb Chop with Rosemary Baby Vegetables

May 3, 2012

Agedashi Tofu


Went over to the mister's house for dinner one night and his mum was cooking up a feast of Japanese dishes - sashimi, sushi, beef tataki and soba noodles, just to name a few. What really captured my attention, though, was her Agedashi Tofu - puffy, crisp and golden outside, with a soft, pillowy centre. I just had to ask her for the recipe, and discovered that it wasn't so hard after all to make - just needed a quick visit to my local Asian grocery for supplies.

Serves 4, as an Entree:

- Chinese white radish (daikon), approx. 3cm x 6cm piece
- 3cm piece fresh ginger
- 800g firm tofu
- ½ cup potato starch, for dusting
- Neutral oil, for deep frying (such as vegetable, sunflower or canola oil. I used rice bran oil)
- Bonito fish flakes, to serve

For the sauce:
- 1 cup water
- 2 tbs soy sauce
- 2 tbs mirin (rice wine vinegar)
- 1 tsp dashi powder


To make the sauce; bring the water, soy sauce and mirin to the boil. Add the dashi powder and stir to dissolve. Carefully taste to see if it is to your liking - adjust accordingly with either more soy sauce, mirin, water or dashi powder. Turn off the heat and set aside to cool.

Peel the ginger, then finely grate and set aside. Peel the white radish, then finely grate and squeeze it dry with the palm of your hands. Set aside in a sieve to drain out excess juices.


Wash the tofu, then pat dry with a paper towel. Place in a colander for at least 30 minutes to drain out excess water. Cut into 8 even pieces. Dip each piece of tofu into the potato starch to coat all sides. Set aside.

 
Heat the oil to 180°C. To test if it is ready for deep-frying, insert a wooden chopstick (or handle of a wooden spoon) into the oil and if bubbles steadily move towards it, then the temperature is correct. If the bubbles move extremely vigorously, then the oil is too hot and needs to cool down a touch (you can do this by adding in a bit more oil). If no or very few bubbles pop up, then the oil is not ready yet!

Carefully place a few tofu pieces into the hot oil, frying them in batches.  Make sure you do not overcrowd the pot - the tofu will stick together and the dramatic temperature drop will result in oily, soggy tofu.


As you can see, I used less oil which only came halfway up the tofu - I simply used wooden chopsticks to flip the tofu over and brown the opposite side.


Transfer the cooked tofu onto absorbent paper towel to drain off excess oil.


To serve, place the tofu in a serving bowl and garnish with grated radish, ginger and bonito flakes. Pour the sauce around the tofu, watch the bonito flakes dance and serve immediately!

Agedashi Tofu

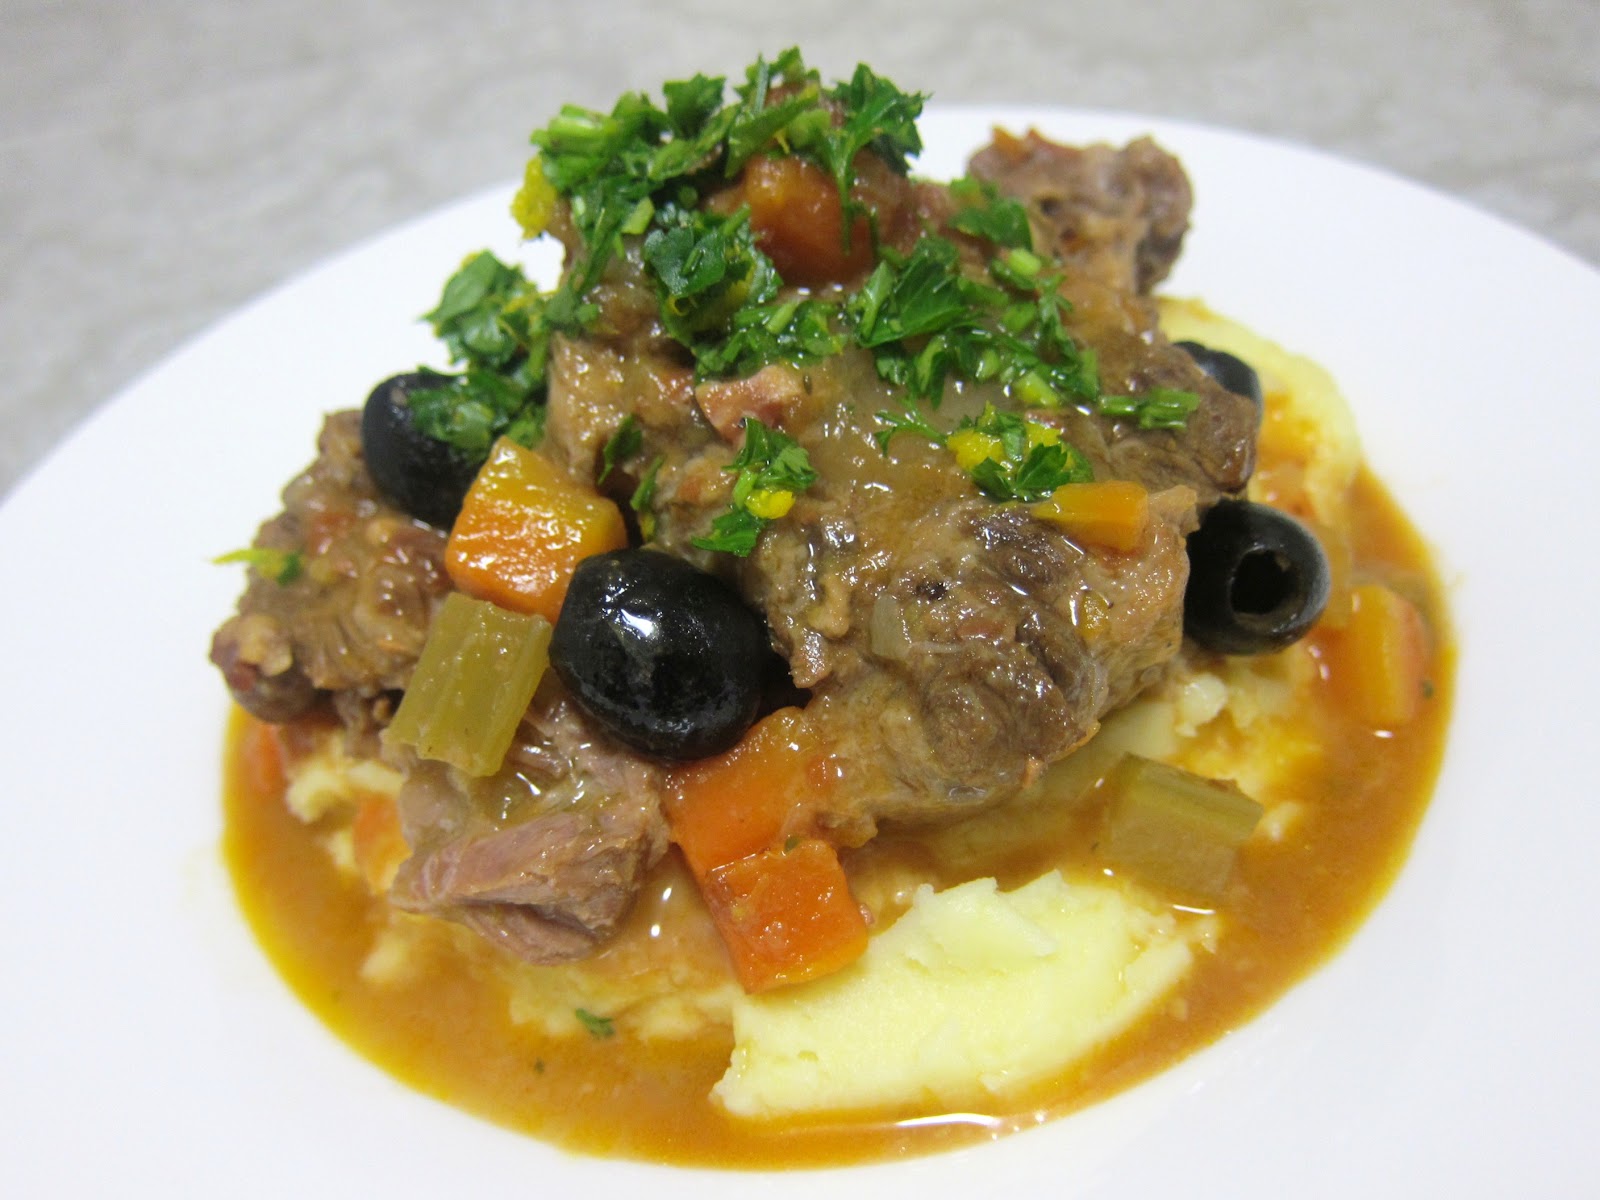
Slow-cooked Ox Tail Stew with Olives


One of my favourite types of dishes to cook are slow-braised stews. I love the fact that even if you add in your own bits and pieces of ingredients, changing things up every time, the end result will still be a delicious, mouth-watering and enriching stew. The magic comes from cooking secondary cuts of meat (cuts that are tough from doing the most work on an animal) on a low heat, which in turn slowly breaks down the connective tissue in the meat and melts it into soft, silky gelatin, giving the braise a wonderfully flavoursome and rich-mouth feel.

 Serves 6:
- 3 dried bay leaf
- Handful fresh thyme
- 6cm strip orange zest
- 2.5kg ox tail
- ½ cup plain flour, seasoned with sea salt and black pepper
- Olive oil
- 250g pancetta, chopped- 1 large brown onion, diced
- 4 carrots, diced
- 3 celery sticks, diced
- 6 cloves garlic, sliced
- 1½ cups dry white wine
- 1 tin diced tomatoes
- 1 litre veal stock
- 1 cup black olives, pitted
- Gremolata, to serve (combine ¼ cup chopped parsley, grated rind 1 lemon, ½ tsp finely chopped garlic)

Either tie the bay leaf, thyme and strip of orange zest together with kitchen string or fill it into a small sachet, net, cheesecloth or tea strainer. Set aside.


Wash and pat dry the ox tail. Roll each piece into the seasoned flour, shaking off any excess. Set aside.


Place a large heavy-bottomed saucepan or casserole pot over med-high heat and fry the pancetta for 2-3 minutes until fragrant. Set aside in a large dish.


In the same saucepan, drizzle in a few glugs of olive oil. Brown the ox tail, doing it in batches if they do not all fit in one single layer. Set aside with the pancetta.


Pour in the white wine, allowing it to bubble fiercely and deglaze the bottom of the pan to take up all the caramelized bits from the browning. Add the onion, carrot, celery and tin of diced tomatoes. Simmer for 5 minutes to reduce a little.


Return the ox tail and pancetta to the saucepan/casserole pot of vegetables, add the bouquet garni of herbs and pour in enough stock to cover everything. Cook over a low heat, at a gentle simmer where only 1-2 bubbles appear at a time, for approximately 3 hours, or until the meat is tender. Discard the bouquet garni and skim the top of any fat or oils, then add the olives and cook for a further 45 minutes. As you can see in the picture below, I skimmed the stew AFTER adding the olives, which proved to be a bit of an obstacle course trying to maneuver the spoon around them!


The stew will taste fabulous as it is at this point. However, if you have the time to do so and prefer a thicker sauce, strain the cooking juices from the meat and vegetables into a smaller saucepan (return the ox tail, vegetables and olives to its original cooking pot). Reduce the strained sauce, simmering until it is reduced by a third or your desired consistency. Pour this sauce back over the meat and vegetables, heat up again and serve while hot with the gremolata and mashed potato, polenta or pasta.


Slow-cooked Ox Tail Stew with Olives

May 2, 2012

Crispy Potatoes in Duck Fat


Serves 4-6:
- 1-2 tbs duck fat
- 1.5kg floury potatoes (such as Coliban, King Edward or Desiree. I used Royal Blue)
- Sea salt and freshly ground black pepper, to taste


Preheat oven to 200°C. Peel the potatoes and cut into rough 3cm chunks, trying to get as many "edges" as possible - these are the parts that will soak up the most duck fat and turn crispy. Add to a large saucepan, completely cover with cold water and a good few pinches of salt. Bring to the boil and simmer on med-low heat for 20 minutes until completely tender. Drain in a colander, lightly shaking to roughen up the edges of the potatoes even more. Allow to cool for 5-10 minutes, until all the steam evaporates.

  
Melt the duck fat in a roasting tray, then add the potatoes, tossing to ensure every piece is covered in the duck fat. Add more fat if needed (omit guilt). Season with sea salt and black pepper and transfer to the oven.


Bake for 1 hour until crispy and golden-brown, but still fluffy and soft on the inside. Serve right away!


Crispy Potatoes in Duck Fat

Braised Mussels with Tomato, Chilli and Basil


Managed to get my hungry hands on a decent kilo of fresh, black mussels. Couldn't think of a better way to serve them than in a finger-licking good white wine and tomato sauce, alongside thick Ciabatta bread to mop up all those juices! This is a recipe, based on Guy Grossi's version from the television show, "Food Safari".

Serves 2 as a main, 4 as a starter:
- 200ml olive oil
- 1 clove garlic, thinly sliced
- Fresh red chilli, chopped (to taste)
- 400ml tomato passata
- 200ml white wine
- Sea salt and freshly ground black pepper
- 1 tsp freshly chopped or ½ tsp dried oregano
- 1kg mussels in the shell, cleaned and "beards" removed
- ½ cup freshly chopped flat-leaf parsley
- Handful basil leaves

Heat the olive oil in a heavy-based saucepan. Sauté the garlic and chilli until slightly softened. Add the passata, bring to the boil, then pour in the wine. If using dried oregano, add now, otherwise add the fresh oregano after simmering. Simmer for 5 minutes, then season to taste with salt, pepper (and fresh oregano). Add the mussels and cover with a lid.


Cook for about 3 minutes, shaking occasionally until the mussels have opened.  Scatter over the basil and serve immediately.


Braised Mussels with Tomato, Chilli and Basil

May 1, 2012

Vietnamese Baked Cassava Coconut Cake


Cassava is a starchy tuberous root that is widely used in Asia, Africa and South America. It is white inside and on the outside, looks like a cross between sweet potato and taro.

This delectable Vietnamese dessert is a sweet, sticky cake that incorporates shredded cassava as the starch content, coconut milk as the fat, and condensed milk as a sweetener. It is very much unlike the usual sponge cake textures that we are used to eating. It is more moist and dense and slightly sticky and creamy. I guess you could compare it to eating sticky rice, but in cake form.

Eating this reminds me of my childhood, where mum used to either buy it from the Asian groceries on her weekly shopping trips or bake at home on the weekends as a treat for my brothers and me. I will never forget the sweet, buttery aroma of freshly baked cassava cake wafting through the house!

You can find shredded cassava in the frozen section of most Asian stores. Try to buy cassava that is from Thailand (it is sweeter and starchier) and not Vietnam. Thaw the cassava before using and either squeeze out the excess liquid or drain it using a muslin cloth.

Serves 6-8:
6 cups shredded Cassava, tightly packed (650g)
¾ cup split mung beans, dried
1
⅓ cup coconut milk
1 tbs canola oil
1 can condensed milk
¾ cup evaporated milk
2 egg yolks
2 tbs caster sugar
1 tsp vanilla extract
1 tbs butter, at room temperature


In a bowl, wash the mung beans thoroughly and discard any bad-shaped beans or little stones. Soak for at least 3 hours in a large bowl (the beans will expand, so ensure there is plenty of water to keep them completely immersed), or overnight if possible, before using.

Preheat oven to 180°C. Place the mung beans in a saucepan, barely cover with water and bring to the boil, then lower to low-medium heat and cook for 20 minutes. Turn off the heat, cover the saucepan with a lid and allow the beans to sit for 15 minutes. The beans should be soft and tender. Push through a sieve to form a smooth paste.

In a large bowl, whisk the egg yolks with the sugar until pale yellow and creamy. Add the vanilla extract, shredded cassava, the condensed, evaporated and coconut milks, the pureed mung beans and oil. Mix to combine. The mixture should be homogenous like a thick cake batter.

Coat the sides of a cake pan with a thin layer of butter and line the bottom with a sheet of baking paper. Pour the cake mixture into the greased pan. Even the batter with a spatula and by gently lifting and dropping the baking pan several times to rid of air bubbles.


Bake for 10 minutes, then lower the heat to 150°C and cook for another 30 minutes. The edges of the cake should be slightly golden and dry. It is ready when a skewer poked through comes out grainy and not sticky or wet. Remove the cake from the pan, place it on a serving dish and let it cool for at least 10 minutes before serving.


Vietnamese Baked Cassava Coconut Cake

Parmesan Chicken Breasts with Prosciutto


This is my go-to recipe (from Jamie Oliver's "Ministry Of Food") for when I am pushed for time to cook dinner, but still want to prepare something that is super tasty and visually appealing. It is a fantastic way to serve chicken breasts, but you can also subsitute in boneless chicken Maryland or thigh fillets. However, keep in mind that the crisp, salty prosciutto is a perfect match with chicken breast, lending moisture and flavour. Bashing the chicken out thinly before you start cooking also means it cooks much faster than a regular chicken breast. 

Serves 2:
- 30 g Parmesan cheese, grated
- 2 sprigs fresh thyme, leaves picked
- 2 skinless chicken breasts
- Freshly ground black pepper
- 1 lemon
- 6 thin slices prosciutto
- Olive oil

Carefully score the underside of the chicken breasts in a criss-cross fashion with a small knife and season with a little pepper. Lay the breasts next to each other and sprinkle over most of the thyme leaves. Grate a little lemon zest over them, then sprinkle with the Parmesan. Lay 3 prosciutto slices on each chicken breast, overlapping them slightly. Drizzle with a little olive oil and sprinkle with the remaining thyme leaves. Put a square of clingfilm over each breast and give them a few really good bashes with the bottom of a pan until they're about 1cm thick.

Put a frying pan over a medium heat. Remove the clingfilm and carefully transfer the chicken breasts, prosciutto side down, into the pan. Drizzle over some olive oil and cook for 3 minutes on each side, turning halfway through, giving the ham side an extra 30 seconds to crisp up.

Either serve the chicken breasts whole or cut them into thick slices and pile them on a plate. Serve with some lemon wedges for squeezing over, and a good drizzle of olive oil. Lovely with mash and green veg or a crunchy salad!

Parmesan Chicken Breasts with Prosciutto, served with Broccolini and Potato Salad

Chunky Mushroom and Bacon Steak Sauce


I think this recipe came about one night when I had almost finished cooking a lovely dinner of steak and vegies and suddenly realised that I forgot to prepare a sauce to complement the dish. So, in a scurry I raided the fridge and came up with this super-easy, quick sauce that surprisingly tasted well with the steak.

Serves 4:
- 1 shallot, finely diced
- Olive oil
- 2 rashers rindless bacon, finely diced
- 1 teaspoon plain flour
- 8 button mushrooms, thinly sliced
- Beef stock
- Sea salt and cracked black pepper, to taste


In a small saucepan, sweat the onion in a drizzle of olive oil on a low heat until softened, without colouring.


Turn up the heat, add the bacon and saute until fragrant, sprinkling over the flour to combine.


Add the mushrooms and continue to cook for 2-3 minutes.


Finally pour in enough beef stock to completely cover the mushrooms, bacon and onion. Simmer on a low heat until sauce has thickened. Season to taste, if required. Serve immediately over steak.

Chicken roasted on Eggplant and Tomatoes


I know I know, the picture above of the lonesome chicken breast does not look too appetizing, but believe me when I say that it tasted absolutely delightful. Donna Hay's ever-simple way of protecting the chicken with a blanket of cheese and then resting it on a bed of tomato and eggplant (both of which ooze of sweet juices when cooked) ensures a moist and satisfying result. Serve with couscous, rice or potatoes - anything that will soak up those delicious juices.

Serves 4:
- 1 eggplant, thickly sliced
- 3 roma tomatoes, sliced
- 1 tbs oregano leaves
- Sea salt and cracked black pepper
- 4 chicken breast fillets
- ½ cup grated parmesan cheese
- ½ cup grated mozzarella cheese

Preheat oven to 180°C. Line a baking tray with baking paper. Place the eggplant slices on the tray and top with the tomatoes, oregano, salt and pepper. Top each pile with a chicken breast and sprinkle with the parmesan and mozzarella. Bake for 20 minutes or until the cheese is golden and the chicken is cooked through. Too easy!

April 30, 2012

Roasted Figs with Prosciutto and Gorgonzola


There are countless variations on how to bake figs, wrapped in prosciutto. This is my standard version, which I play around with by adding in walnuts, a sprinkle of thyme leaves, a squeeze of fresh orange juice or a drizzle of honey. I love that you can prepare it all beforehand for dinner parties and simply put it in the oven 15 minutes before eating. What's your favourite combination?

Serves 4:
- 4 fresh figs
- 50g Gorgonzola Dolce (or any soft, mild blue cheese)
- 4 slices prosciutto
- Extra virgin olive oil
- Sea salt and freshly cracked black pepper

Preheat oven to 200°C. Make a small criss-cross incision at the top of each fig and push in a little piece of gorgonzola. Carefully wrap each fig in a slice of prosciutto. Use a toothpick to hold it in place if you find that the prosciutto is not clinging on well.


Bake in the oven for 15 minutes. The cheese will melt and the prosciutto will crisp. Serve immediately on rocket or spinach leaves, dressed in olive oil and sea salt and finish off with cracked pepper. 

Whole Baked Fish with Herbs and Caramelized Lemons


This is such a clever and healthy way of cooking fish, where the delicate flavour is enhanced beautifully by oven-steaming on a bed of herbs and rounded off with slices of caramelized lemon. Gordon Ramsay's "Sunday Lunch" uses salmon which works best, but feel free to substitute in whatever fresh fish you can get your hands on.

Serves 6-8:
- 1 whole fish, about 1.6kg, scaled, gutted and washed
- Olive oil, for cooking and to drizzle
- Sea salt and freshly ground black pepper
- 2 bay leaves
- Few sprigs each of rosemary, thyme, basil, sage and parsley (any mixture of soft and hard herbs will do)
- 1 head of garlic (unpeeled), halved horizontally, then broken into cloves
- 2-3 lemongrass stalks, split in half lengthways and bruised with the back of a knife
- 2 lemons, thickly sliced
- 5-6 star anise
- 1 tsp mixed (or black) peppercorns

Preheat oven to 190°C. Trim a little off the tail and fins of the fish with kitchen scissors and pat dry with kitchen paper. Pat the cavity dry as well. Score the skin of the fish on both sides with a sharp knife, at 1-2cm intervals. Rub all over with olive oil, salt and pepper.

Tear two sheets of foil, large enough to envelope the fish easily. Lay one on top of the other on the work surface and scatter the bay leaves, herb sprigs, garlic and lemon grass over the middle of the foil. Lay the fish on the bed of herbs and tuck some of the flavourings into the cavity.

Fry the lemon slices in a little olive oil for 2-3 minutes until caramelized around the edges, seasoning them with salt and pepper. Allow to cool slightly. Tuck the lemon slices around the fish, placing some in the cavity and some on top. Scatter the star anise and peppercorns over and around the fish, putting some inside the cavity too. Drizzle with a little olive oil.

Fold the edges of the foil tightly together over the fish to seal, leaving some space in the parcel for steam to surround and cook the fish. Put the fish parcel in a roasting tin and cook in the centre of the oven for 25-30 minutes, depending on the thickness of the fish. Remove from the oven and without unwrapping the foil parcel, rest the fish for 5-10 minutes.

Unwrap the fish and if using salmon, peel off the skin with a palette knife. Use the back of a spoon to gently slide the fish off the bone. Serve individual portions garnished with the caramelized lemons.

Rustic Ratatouille


Perfect for the cold wintery days approaching us in Melbourne, this simple version of making the French favourite, ratatouille, can be served as a warm side dish or even as a meal on its own with bread, pasta or rice. I have adapted the recipe from Gordon Ramsay's "Makes it Easy" and have added an egg for a delicious protein twist. Grating over Parmesan cheese and grilling the ratatouille until it is crispy and golden on top also works well!

Serves 6 (as a side):
- 2 large tomatoes
- 1 small red capsicum, deseeded
- 1 small yellow capsicum, deseeded
- 1 tbs olive oil
- 2 garlic cloves, finely chopped
- 1 red onion, finely chopped
- 2 large zucchinis, chopped
- 1 eggplant, chopped
- Handful of basil leaves, roughly torn
- Dash of balsamic vinegar
- 4 eggs (optional)

Halve and de-seed the tomatoes, then finely chop the flesh. Cut each of the capsicums into a 1 cm dice. Heat the olive oil in a saucepan and cook the garlic and onion gently for 2 minutes to soften. Add the zucchini, eggplant, tomatoes and capsicum, stir and cook for about 5 minutes to soften. Add the basil and balsamic vinegar, and season to taste. If using eggs, spoon the ratatouille into 6 individual serving ramekins, leaving a 1 cm space from the top. Crack an egg over each filled ramekin and grill until the egg is cooked to your liking. Serve immediately!